July 22, 2026
Zone-by-Zone Waterproofing in Ibiza: Roofs, Terraces and Basements
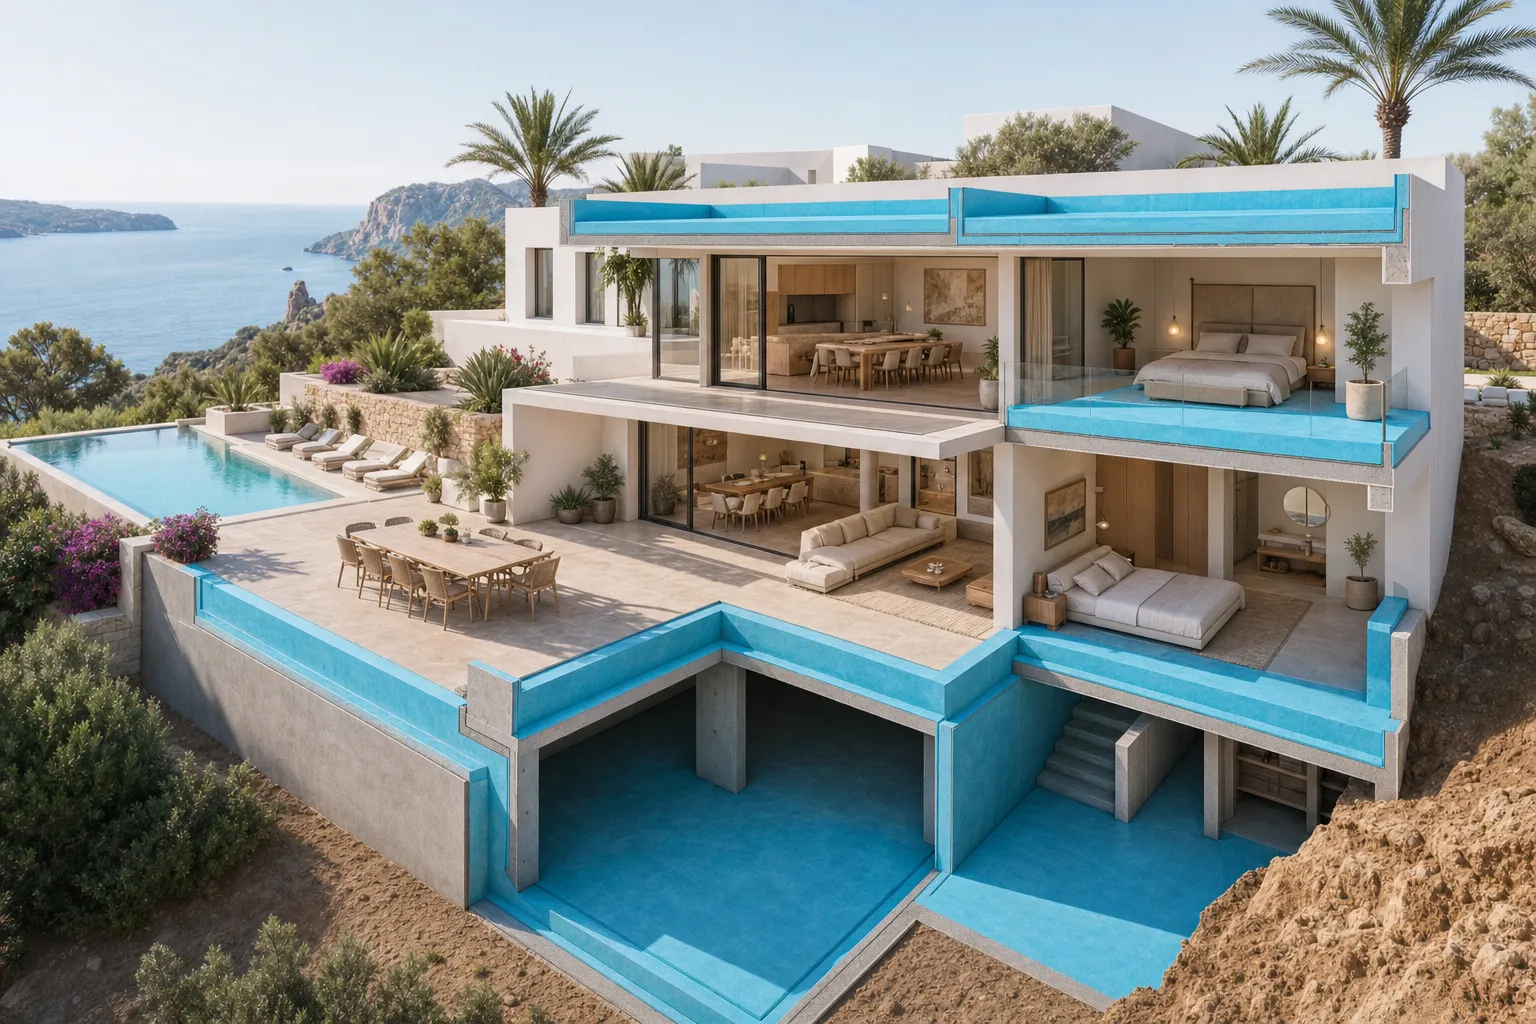
Waterproofing a luxury Ibiza villa isn’t one project — it’s at least four projects, one per zone, each with a different exposure, a different stress profile and a different correct technical answer. A flat roof asks for one system; a buried basement wall asks for a completely different one; a walkable terrace over a habitable room asks for a third. The mistake we see most often is owners (or under-specified contractors) treating waterproofing as one decision with one product. The result is a villa that’s overspec’d in one zone and underspec’d in three.
This guide is the zone-by-zone playbook: for each major waterproofing area in a luxury Ibiza villa, what the failure mode is, which system to specify, the installation details that decide longevity, and how to integrate them so the whole villa is sealed as a system rather than a patchwork of products.
The four zones and why they’re different
Each waterproofing zone has its own physics. A flat roof sees direct radiation and ponding water; a basement wall sees hydrostatic pressure from outside and humidity from inside; a balcony sees foot traffic and movement joints; a terrace over a kitchen sees the worst of every category at once. The system that’s optimal for one zone is wrong for another.
| Zone | Recommended system | Walkable? | Real lifespan in coastal Ibiza | Cost (€/m² installed) | Key risk if mis-specified | Typical applicator |
|---|---|---|---|---|---|---|
| Flat roof (non-walkable) | Liquid PU + UV-stable top coat | No (maintenance only) | 20–25 years | 40–70 | UV degradation, ponding failure | Specialist waterproofing |
| Walkable terrace over habitable space | Liquid PU + protection layer + porcelain on pedestals | Yes (full furniture) | 20–25 years | 110–180 | Tile crack from movement, point loads | Specialist + tiler coordination |
| Balcony (overhanging) | Liquid PU with reinforced edge detail | Yes (light) | 15–20 years | 70–110 | Edge water tracking back into structure | Specialist waterproofing |
| Basement / buried wall | Negative-side liquid PU + drainage membrane | N/A | 30+ years | 60–120 | Hydrostatic blowback, mineralized seepage | Specialist + drainage |
| Pool shell (referenced for completeness) | Liquid PU + Mortex (see separate guide) | N/A | 20–25 years | 120–180 | Seam failure at penetrations | Pool waterproofing specialist |
| Sandwich roof (with solar) | Two-component PU + ballast under panels | Limited | 20–25 years | 50–80 | Penetrations from mounting hardware | Coordinated PV + waterproofing |
“La estanquidad de una edificación se proyecta por zonas, no por productos. El sistema correcto en cada zona depende de la solicitación específica (estática, dinámica, hidrostática, transitabilidad) y de la geometría de los encuentros y penetraciones. Es por eso que el CTE-DB-HS-1 trata cada zona con su propia exigencia.”
ANI — Asociación Nacional de Impermeabilizadores y Cubiertas
Flat roof: where 70% of villa leaks originate
The flat roof of a modern Ibiza villa is the single most stressed waterproofing zone. Direct sun, daily 30°C+ thermal swings, occasional torrential rain ponding for hours, salt aerosol, and bird activity. Anything specified here that doesn’t anticipate all five fails within 7 years.
What we specify: two-component liquid polyurethane (Hyperdesmo or equivalent) applied in two coats over a primer matched to the substrate, with prefabricated reinforcement at every drain, penetration and perimeter. UV-stable top coat in a light color (gravel-look, white, sand) — never anthracite or black on an exposed flat roof, which doubles surface temperature and shortens membrane life by 30–40%.
The detail that decides 70% of failures: slope to drain. A flat roof should have minimum 1–2% slope toward the drains, with no flat zones where water pools. We’ve seen multiple Ibiza villas where the slope was specified correctly on paper but the contractor laid screed flat — and the membrane fails in the ponded zones within 5 years, regardless of product quality.
Walkable terrace over habitable space: the hardest zone
A terrace over a living room or bedroom has three constraints simultaneously: full waterproofing performance (any leak shows up immediately below), foot traffic and furniture loads, and the aesthetic finish the owner actually wants. Solving all three takes a layered system, not a single product.
The build-up we specify, from substrate up: structural slab, slope screed (1–2% to drains), liquid polyurethane membrane (full continuous), protection geotextile, drainage layer (HDPE egg-crate), filter geotextile, gravel ballast (15–30 mm), and porcelain pavers on adjustable pedestals as final finish. Pedestal-mounted pavers are key — they let water drain freely below, are demountable for membrane inspection, and accommodate slight movement without cracking.
What we explicitly avoid: porcelain tile glued directly to the membrane. It looks the same in photos but fails predictably — thermal expansion of the tile vs the substrate cracks the grout, water gets through, repair means destroying the entire tiled surface to access the membrane. The cost difference between glued vs pedestal-mounted pavers is small; the lifecycle difference is huge.
Basement / buried walls: working against hydrostatic pressure
Buried walls of basement or partial-basement levels face a different challenge: water on the outside of the wall under positive pressure. Conventional positive-side waterproofing (applied to the exterior face during construction) is ideal but rarely possible on existing buildings without major excavation. On retrofits, we specify negative-side liquid polyurethane on the inside of the wall combined with a drainage membrane (e.g., Delta MS) to manage the pressure.
The detail that matters: tying the new membrane into the existing foundation slab at the corner. The wall-to-slab corner is where 80% of basement waterproofing failures occur. A reinforcement strip 30 cm up the wall and 30 cm onto the slab, embedded into the membrane during the second coat, is non-negotiable.
For new construction, we always specify positive-side membrane during the construction phase — costs €20-30/m² incremental on a build that’s already happening; saves €200/m² of retrofit cost later.
Balconies and overhangs: the edge detail problem
An overhanging balcony in coastal Ibiza is exposed to wind-driven rain at angles the design book didn’t anticipate. The detail that almost always fails is the balcony edge: water tracks under the membrane along the edge and back into the structure of the building. Repair is complicated because the failure point is invisible from the top of the balcony.
Solution: drip edge profile (metallic or PVC) installed before the membrane, with the membrane wrapped over it and a sealed termination on the underside. Combined with proper slope (toward the front, away from the building) and a perimeter gutter to capture wind-driven water that runs off the edge.
How IBOSSIM coordinates multi-zone waterproofing
Three protocols. First, a waterproofing master plan as part of the initial project, mapping every zone, the system specified for each, and the integration details at zone boundaries (e.g., where the flat roof meets the parapet wall, where the balcony meets the facade). Without the master plan, individual zones get done well but the transitions fail — and transitions are where leaks happen.
Second, single contractor per system family. We don’t subcontract liquid PU to one team and Mortex to another, because the chain of responsibility breaks at the handoff. The same waterproofing specialist handles all PU work across the villa — flat roof, terraces, balconies, basement — for consistent quality and consolidated warranty.
Third, documented installation. Every layer photographed, dated, with substrate humidity reading at the time of application. Owners receive a complete waterproofing file at handover; warranty service 10 or 15 years later is conditional on documented installation. This connects directly with our broader article on the invisible shield — the membrane you don’t see is what protects the villa you do.
FAQ
Can I waterproof one zone now and the others later?
Yes, but plan the transitions. If you waterproof the flat roof now and the basement in two years, the perimeter detail where they meet (foundation, drainage, exterior wall waterproofing) needs to be designed once for both campaigns. Not coordinated, the transition fails.
What’s the warranty I should expect?
Premium liquid PU systems carry 20–25 year manufacturer warranty conditional on certified installation. Installer workmanship warranty: typically 10 years. Anything less than 10/20 on a luxury villa is below market for the segment.
Is bituminous membrane ever the right answer?
Rarely on luxury villas in coastal Ibiza. Bituminous is cheaper upfront but fails at seams under UV and salt exposure faster than liquid PU. We specify it occasionally for very large, simple flat roofs where the cost premium of PU doesn’t justify itself; not a common case in our segment.
How long does multi-zone waterproofing take to install?
For a 300–500 m² villa with all four zones: 6–10 weeks total, with phases that don’t overlap (membrane curing time forces sequence). For a single zone (e.g., just the flat roof), 1–2 weeks.
Can existing waterproofing be assessed without removing the finish?
Indirectly yes — infrared thermography reveals zones where the membrane has failed (heat patterns change where water is present below). Direct inspection requires lifting the finish at suspect zones. We use thermography first; targeted excavation only where the camera flags problems.
Waterproofing in a luxury Ibiza villa is a system, not a product. Done zone by zone with the right systems and integration details, it lasts 20–25 years and the owner forgets it exists. Done as one product across all zones, it fails predictably within 8 years and the repair costs are 3–4x the original investment.
Request a Multi-Zone Waterproofing Plan
Related reading: The Invisible Shield: How to Protect Your Building · Managing Humidity in Ibiza Homes · Mortex — Premium Cement Finish.