Pool Waterproofing in Ibiza: Systems, Materials and Common Mistakes
The pool that’s losing a centimetre of water every day in August isn’t evaporating that fast. It’s leaking. And the difference between catching it now and discovering it next season usually comes down to which waterproofing system was specified five, ten or fifteen years ago. In Ibiza coastal villas — where the combination of UV exposure, salt aerosol, hard water and pool chemicals stresses every layer of the system harder than in continental climates — the waterproofing decision is the single longest-lived choice in a pool project.
This guide compares the four serious systems used today on premium villa pools in Ibiza, explains how each one fails (because each one fails differently), and lays out the common installation mistakes that turn a 25-year membrane into a 6-year disaster. Written for owners of luxury villas who want to understand what they’re buying or what’s been done to their existing pool.
Why pool waterproofing matters more on a luxury Ibiza villa
Three things make a coastal Ibiza pool harder on its waterproofing than the same pool inland. First, daily salt aerosol over a 6-month season penetrates micro-cracks much faster than freshwater environments, accelerating membrane degradation and corroding any embedded metal. Second, UV exposure on south-facing pools in Ibiza is at the upper end of European values; most polymeric membranes that look bulletproof in continental tests embrittle within 7–10 years here. Third, the calcium-rich local water leaves mineral deposits that interact chemically with cement-based finishes.
The economic consequence of all this: pools that lose water every day waste 80–150 m³ per season (water now costing €4–7/m³ on the island in restricted periods), and a failed waterproofing requires draining, mechanical removal of the old system, repair of the substrate, and a new installation — typically €18,000–45,000 on a luxury pool, plus the season the pool is out of service. The cost of getting the original specification right is small in comparison.
The four systems: liquid polyurethane vs EPDM vs hydrophobic mortar vs gunite
Each system has a different failure pattern and a different design context where it makes sense. They’re not interchangeable. Choosing the wrong one for the pool geometry, substrate condition or aesthetic finish leads to predictable failures — patterns we see every season on pools built by contractors who pick the cheapest option.
| System | Real lifespan in coastal Ibiza | Cost (€/m²) | UV resistance | Concrete adhesion | Ease of repair | Final aesthetic |
|---|---|---|---|---|---|---|
| Liquid polyurethane + Mortex | 20–25 years | 120–180 | Excellent (protected by Mortex) | Excellent (continuous bond) | Easy (spot repairs) | Seamless, minimalist (anthracite, sand, off-white) |
| EPDM membrane (1.2–1.5 mm) | 20–30 years (membrane only) | 70–110 | Good | Mechanical (no chemical bond) | Hard (welded seams) | Visible seams, blue/grey/black palette |
| Hydrophobic / waterproof mortar | 8–15 years | 40–70 | Fair (cracks with movement) | Native (substrate continuity) | Difficult (must repair entire affected area) | Render finish, paint or tile over |
| Gunite (sprayed concrete with admixtures) | 30+ years (structure) | 90–140 | Good (with finish over) | Structural | Specialist required | Always needs a finish layer over |
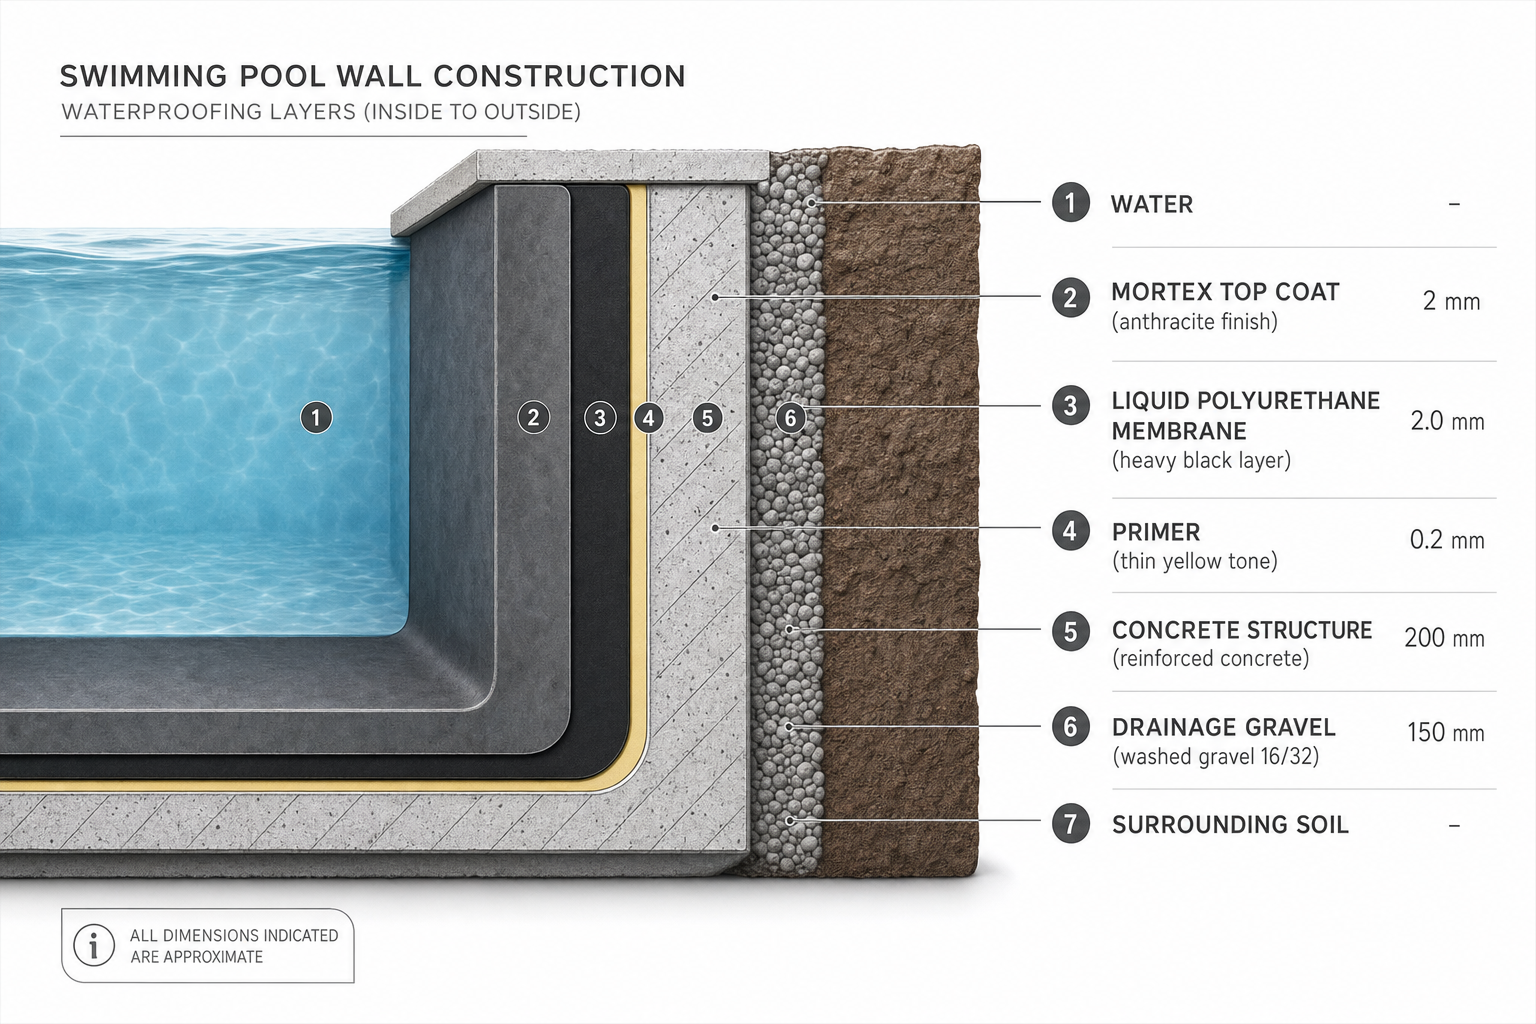
Liquid polyurethane with Mortex top coat is the system we install most often on premium pools in Ibiza, and the one we recommend for new construction or full refurbishment. The reasons are technical: it’s the only continuous (seamless) system, it handles geometric complexity (curved walls, infinity edges, multiple steps) without compromise, the chemical bond with concrete resists hydraulic pressure better than any mechanical anchoring, and the aesthetic — Mortex finish — is what the luxury segment in Ibiza increasingly demands.
EPDM still has its place: it’s the system to consider on existing pools where draining and reconstructing the substrate is impossible, or on geometrically simple pools (rectangular, single depth) where the cost premium of liquid PU isn’t justified. The trade-off is visible seams and a less premium finish.
“Pool waterproofing failure rarely originates in the membrane itself. It originates in substrate preparation, in the joint detail at penetrations (skimmer, lights, returns) and in the curing protocol. A premium membrane installed on poorly prepared concrete fails earlier than a mid-range membrane correctly installed.”
ASOFAP — Asociación Española de Profesionales del Sector Piscina
How each system fails — and why
Knowing the failure mode of each system is more useful than knowing its strengths. When you understand how a system fails, you can specify the installation detail that prevents the failure.
Liquid polyurethane
Fails at penetrations 90% of the time when it fails — skimmer flange, light niches, return jets. The membrane on flat or curved walls almost never fails in itself. Prevention: prefabricated PU reinforcement strips at every penetration, applied during the second coat, not as an afterthought.
EPDM membrane
Fails at welded seams when adhesives degrade or when the welder didn’t get the right temperature on a hot day. Prevention: use mechanical bar termination + vulcanized seams (not adhesive), and demand temperature logging on the welding equipment during installation.
Hydrophobic mortar
Fails by cracking when the underlying concrete moves — settlement, thermal expansion, structural flex. The mortar is rigid; the concrete moves. Prevention: only specify on substrates with no recent or expected movement, and accept that 10–15 years is realistic ceiling.
Gunite
Doesn’t strictly fail because it’s structural concrete, not a membrane. The “failure” is the finish layer on top (paint, tile, plaster) which always has its own lifespan. Specifying gunite without specifying what goes over it is incomplete spec.
Installation details that decide the outcome
The membrane material matters; the substrate preparation matters more; the penetration detailing matters most. In that order. We see this confirmed every season by which pools fail and which don’t.
- Substrate preparation: the concrete shell must be cured for minimum 28 days, sanded to remove laitance, washed and fully dried (residual humidity below 4%). On Ibiza this can take longer than continental climates because of high ambient humidity. Skipping this is the #1 cause of early failure.
- Primer selection: matched specifically to the substrate (smooth concrete vs gunite vs existing membrane). Different primers exist for different cases. The same generic primer everywhere is wrong everywhere.
- Penetration reinforcement: at skimmer, lights, jets, drains, every single penetration gets a prefabricated reinforcement piece, glued and embedded into the second coat. Field-cut reinforcement on the fly is a common shortcut that costs years of membrane life.
- Curing time between coats: liquid PU requires 24–48 hours between coats depending on temperature and humidity. Applying the second coat too early traps solvents that escape later as bubbles. We’ve seen this on pools done in August when contractors are rushing.
- Top coat application: for Mortex over PU, the application has to start within the manufacturer’s overcoat window (typically 48–72 hours after PU cure). Outside that window, mechanical bonding is compromised.
Diagnosing a leak on an existing pool — before deciding what to do
A pool losing more than 1 cm/day in non-extreme weather has a structural leak. Evaporation in Ibiza summer is real (4–8 mm/day depending on wind), but daily losses above that point to a problem. Before deciding on a system, the leak source needs to be identified — repairing the wrong area solves nothing.
- Bucket test: a bucket filled to the same waterline as the pool, placed on the deck. Compare evaporation in both over 24h. Difference = leak rate.
- Stop the pump test: mark waterline, turn pump off for 12h. If water keeps dropping with pump off, the leak is in the structure (shell, walls, drain). If it stops, the leak is in the plumbing.
- Dye test at penetrations: with pool still and pump off, inject dye near skimmer and returns. Dye flowing into a penetration indicates the leak point.
- Pressure test on plumbing: isolate suction and return lines, pressurize each to 1.5 bar with a contractor pressure gauge. Loss of pressure = pipe leak (separate problem from membrane).
Only after locating the failure source does it make sense to decide between spot repair, partial refurbishment or full replacement. Skipping diagnosis and re-membranating the whole pool is sometimes necessary; often it’s not.
How IBOSSIM approaches a pool waterproofing project
Three protocols on every project. First, substrate inspection with humidity meter and crack mapping before quoting — we know what we’re applying to before promising a result. We’ve quoted pools where the substrate humidity was 8% and the right answer was “wait three weeks and we’ll come back” rather than apply membrane that would fail. Easier to say no early than fix the resulting mess.
Second, manufacturer-warranted systems only. Our standard liquid PU is the Hyperdesmo line (Alchimica/Triflex) combined with Mortex Aquaciment top coat, both manufactured under ISO 9001 with documented 25-year track record. The 25-year membrane warranty requires that the entire system — primer, membrane, top coat — comes from manufacturer-approved suppliers and is applied by certified installers. We are.
Third, photographic documentation of every layer during installation. Substrate humidity reading photographed; primer application photographed; each membrane coat with elapsed time and temperature; penetration reinforcement detail. The owner receives a complete file at handover. This matters when, 12 years later, you want warranty service or you’re selling the villa — documented installation is verifiable. Verbal claims aren’t.
FAQ
How long does pool waterproofing take from drain to refill?
For a full PU + Mortex system on a 60 m² pool: 3–4 weeks. Breakdown: 2 days drain and clean, 3 days substrate prep, 3 days primer + first membrane coat (with cure), 3 days second coat + reinforcement details, 5 days Mortex top coat (multi-coat with cure), 5–7 days final cure before filling. Plumbing work in parallel.
Can the existing finish (paint, tile) stay or does it have to go?
Always remove it. Paint has variable adhesion and is incompatible with PU. Old tile usually has grout that’s already failing. Premium pool waterproofing always starts on bare, sound concrete. Removal is part of the price.
What’s the difference between Mortex and microcement on a pool?
Mortex (Aquaciment by Sertec) is a specific cement-based decorative finish formulated for permanent water immersion. “Microcement” is a category — some products in it are water-immersion-rated, most aren’t. Specifying “microcement on the pool” without knowing which product means accepting unknown risk. We specify Mortex by name.
What warranty should I get?
Premium systems carry 25-year manufacturer warranty on the membrane (Hyperdesmo and similar), conditional on certified installation and documented application. Installer warranty on workmanship is typically 5 years on top. Beware “lifetime guarantees” — they’re rarely backed by anything verifiable.
Does pool waterproofing require a building permit?
Re-waterproofing existing pools typically doesn’t require permits in Ibiza (counts as maintenance). New pools or major reconfiguration always require permits. The line gets blurry when reshaping the pool slightly — discuss with the municipality before starting.
A pool that lasts 25 years isn’t an accident. It’s specification, substrate preparation, penetration detailing and certified application — in that order. If your pool is losing more than 1 cm/day, or if you’re planning a new pool and want to specify it correctly from day one, the diagnostic visit is the first concrete step.
Related reading: How to Plan the Construction of a Pool · Mortex — Premium Cement Finish · The Invisible Shield: How to Protect Your Building.